
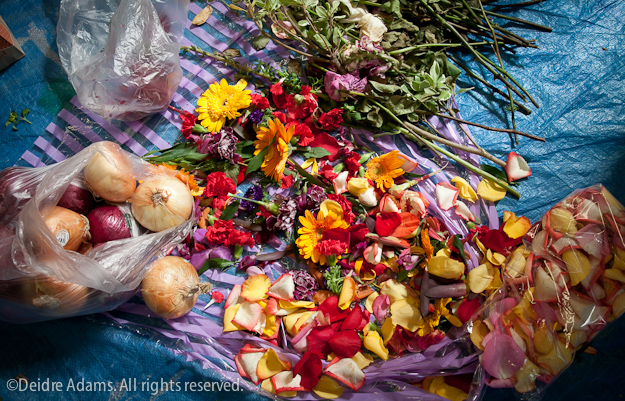
Rose petals, onion skins, various leaves and flowers used for dyeing in class
Near the end of Day 2 of the Traveler’s Notebook workshop, we prepared and simmered more bundles. The difference this time was that the pot was richer in mordanting compounds – both through the accumulation of plant materials from prior dyeing as well as through the addition of odd hunks of scrap iron and other metal. We also left the bundles wrapped overnight so that the dyes could have more time to set. The first thing next morning, we opened our bundles with as much anticipation and excitement as children on Christmas morning. I was a lot happier with my results this time.


While waiting for bundles to come out of the dyepot, we continued to make more sheets collaged with fabrics, papers, and special mementos, held together with stitch. We also did a writing exercise to create a page covered with a texture made of our own handwritten marks. (More on this later.)
With all these raw materials now in progress for our finished books, the next thing to do would be to create a binding structure for the finished books. This was to be based on the Blizzard Book, a structure created by Hedi Kyle during a blizzard.
The folds of the Blizzard Book are called “mountains” (outer folds) and “valleys” (inner folds). Because we would be stitching all of our pages to folds of the Blizzard Book, we added support to the paper by hand-stitching a length of fabric to the center portion. Then we accordion-folded these large sheets of paper and prepared them for dyeing by the same processes as used before.
While waiting for the real binding structures to dry after dyeing, we practiced the Blizzard book folding technique with a dummy sheet. The process is rather paradoxical – it seems simple when you see it demonstrated, but then when you try it, you realize how complex it can be when you can’t remember what to do next. Instructions for making your own Blizzard Book can be found in the Penland Book of Handmade Books. You can also find a PDF with instructions here.


The last step of the bookmaking process was to attach the materials made during the last few days to the folds of the Blizzard Book structure. I didn’t get mine finished, but several people did, and the results were spectacular.


I had one more goal I wanted to accomplish in class. Many artists are packrats, and I’m no exception. I’ve been holding onto a large stack of Rives BFK printmaking paper in thin strips, the remnants of trimming large sheets to a specific size for intaglio prints when I was in school. When the supply list said to bring scraps of paper, I threw these in with my materials. I used the class time to dye these strips. I don’t know yet what I’ll use them for, but I do think they’re quite beautiful.

these papers are wonderful . . and the books also. . thanks for sharing. H.
thank you for these very clear and lovely photos of india’s workshop. i love the picture of all the workshop participants leaning in to watch india’s hands. and the books are just great!
Thank you so much, Deidre, for detailing so thoroughly, the highlights of the SDA conference, exhibitions and workshops. I doubt I will ever participate in one of these conferences, but as an SDA and SAQA member, your posts really helped share the experience with others, like myself. Very much appreciated.
Chimo,
Jennifer Cooper
thank you thank you thank you!! so wonderful to see your luscious pictures….
This is so inspiring! I am waiting for my Eco Colour book to arrive from the library.
Meanwhile, could you say whether you can do this process in a stainless steel pot or whether you need one that is made of iron or copper? I’d love to try this soon. Also, for cotton, do you have to add vinegar to the pot or just boil the bundles and let them sit?
Thanks!
Diane, obviously I’m no expert, but I believe you could use any kind of pot.
Reactive metals like iron, copper, aluminum, brass, or tin will influence the colors you get. Stainless steel won’t react with the dyeing process, but you’ll still get results from the plant material you use. You can also put pieces of metal into the pot with your fabrics to get the reaction. We replaced our kitchen faucet this year, and I saved the copper tubing out of it to use for this purpose. When you get the book, read about “Dye-Pot as Mordant” on page 100.
Cotton is a cellulose fiber, and you are dyeing with plant material (also cellulose), so rather than vinegar (acidic), you would want to use an alkaline or protein solution to help the bonding process. Alkaline solution can be made from ash water, certain leaves or barks, or, if you do any other type of dyeing, you may already have some soda ash, which would work. Proteins are milk, soy milk, eggs, etc. Read about “Processes for Mordanting Cellulosic Fibres” on page 104.
Letting things sit for awhile is also important. But you do have to be careful about mold – I ran into this problem with the last dyeing session I tried.
Thanks so much, Deirde! As soon as I get the book, I will read the pages you suggest.
I have some copper flashing left from a roofing project and since I do a lot of MX dyeing, I also have soda ash. So I might try these. I will take your advice and not let things sit too long, especially in this hot weather.
I live in New England and have no idea what plant materials to try. So I may just do a couple of random experiments. We live right across the street from an arboretum, so I’m hoping there will be lots of interesting materials on the ground in the fall that I can pick up. By then I will have read the book.
Diane